sailboats, the Cal 29
The Cal 29s.
. The first Cal 29 was designed by Bill Lapworth in 1968 and hull #1 was
launched in 1969. (Practical Sailor, Dec 1995)
I'm not sure how long the 2-29 was produced. I have no photos or line drawings
of the 29 but here are the specs on the 2-29 Cal. I'm sure that there were more 29
Cals designed. I think that this 2-29 was the second design of the 29 foot Cal line,
same as the 2-27 was the second design of the 27.
Here are the specs for the Cal 2-29. These words were scanned directly from Jensen's Guide. Note: There were more than one design of the 29 foot Cal, same as there were more than one Cal 27.
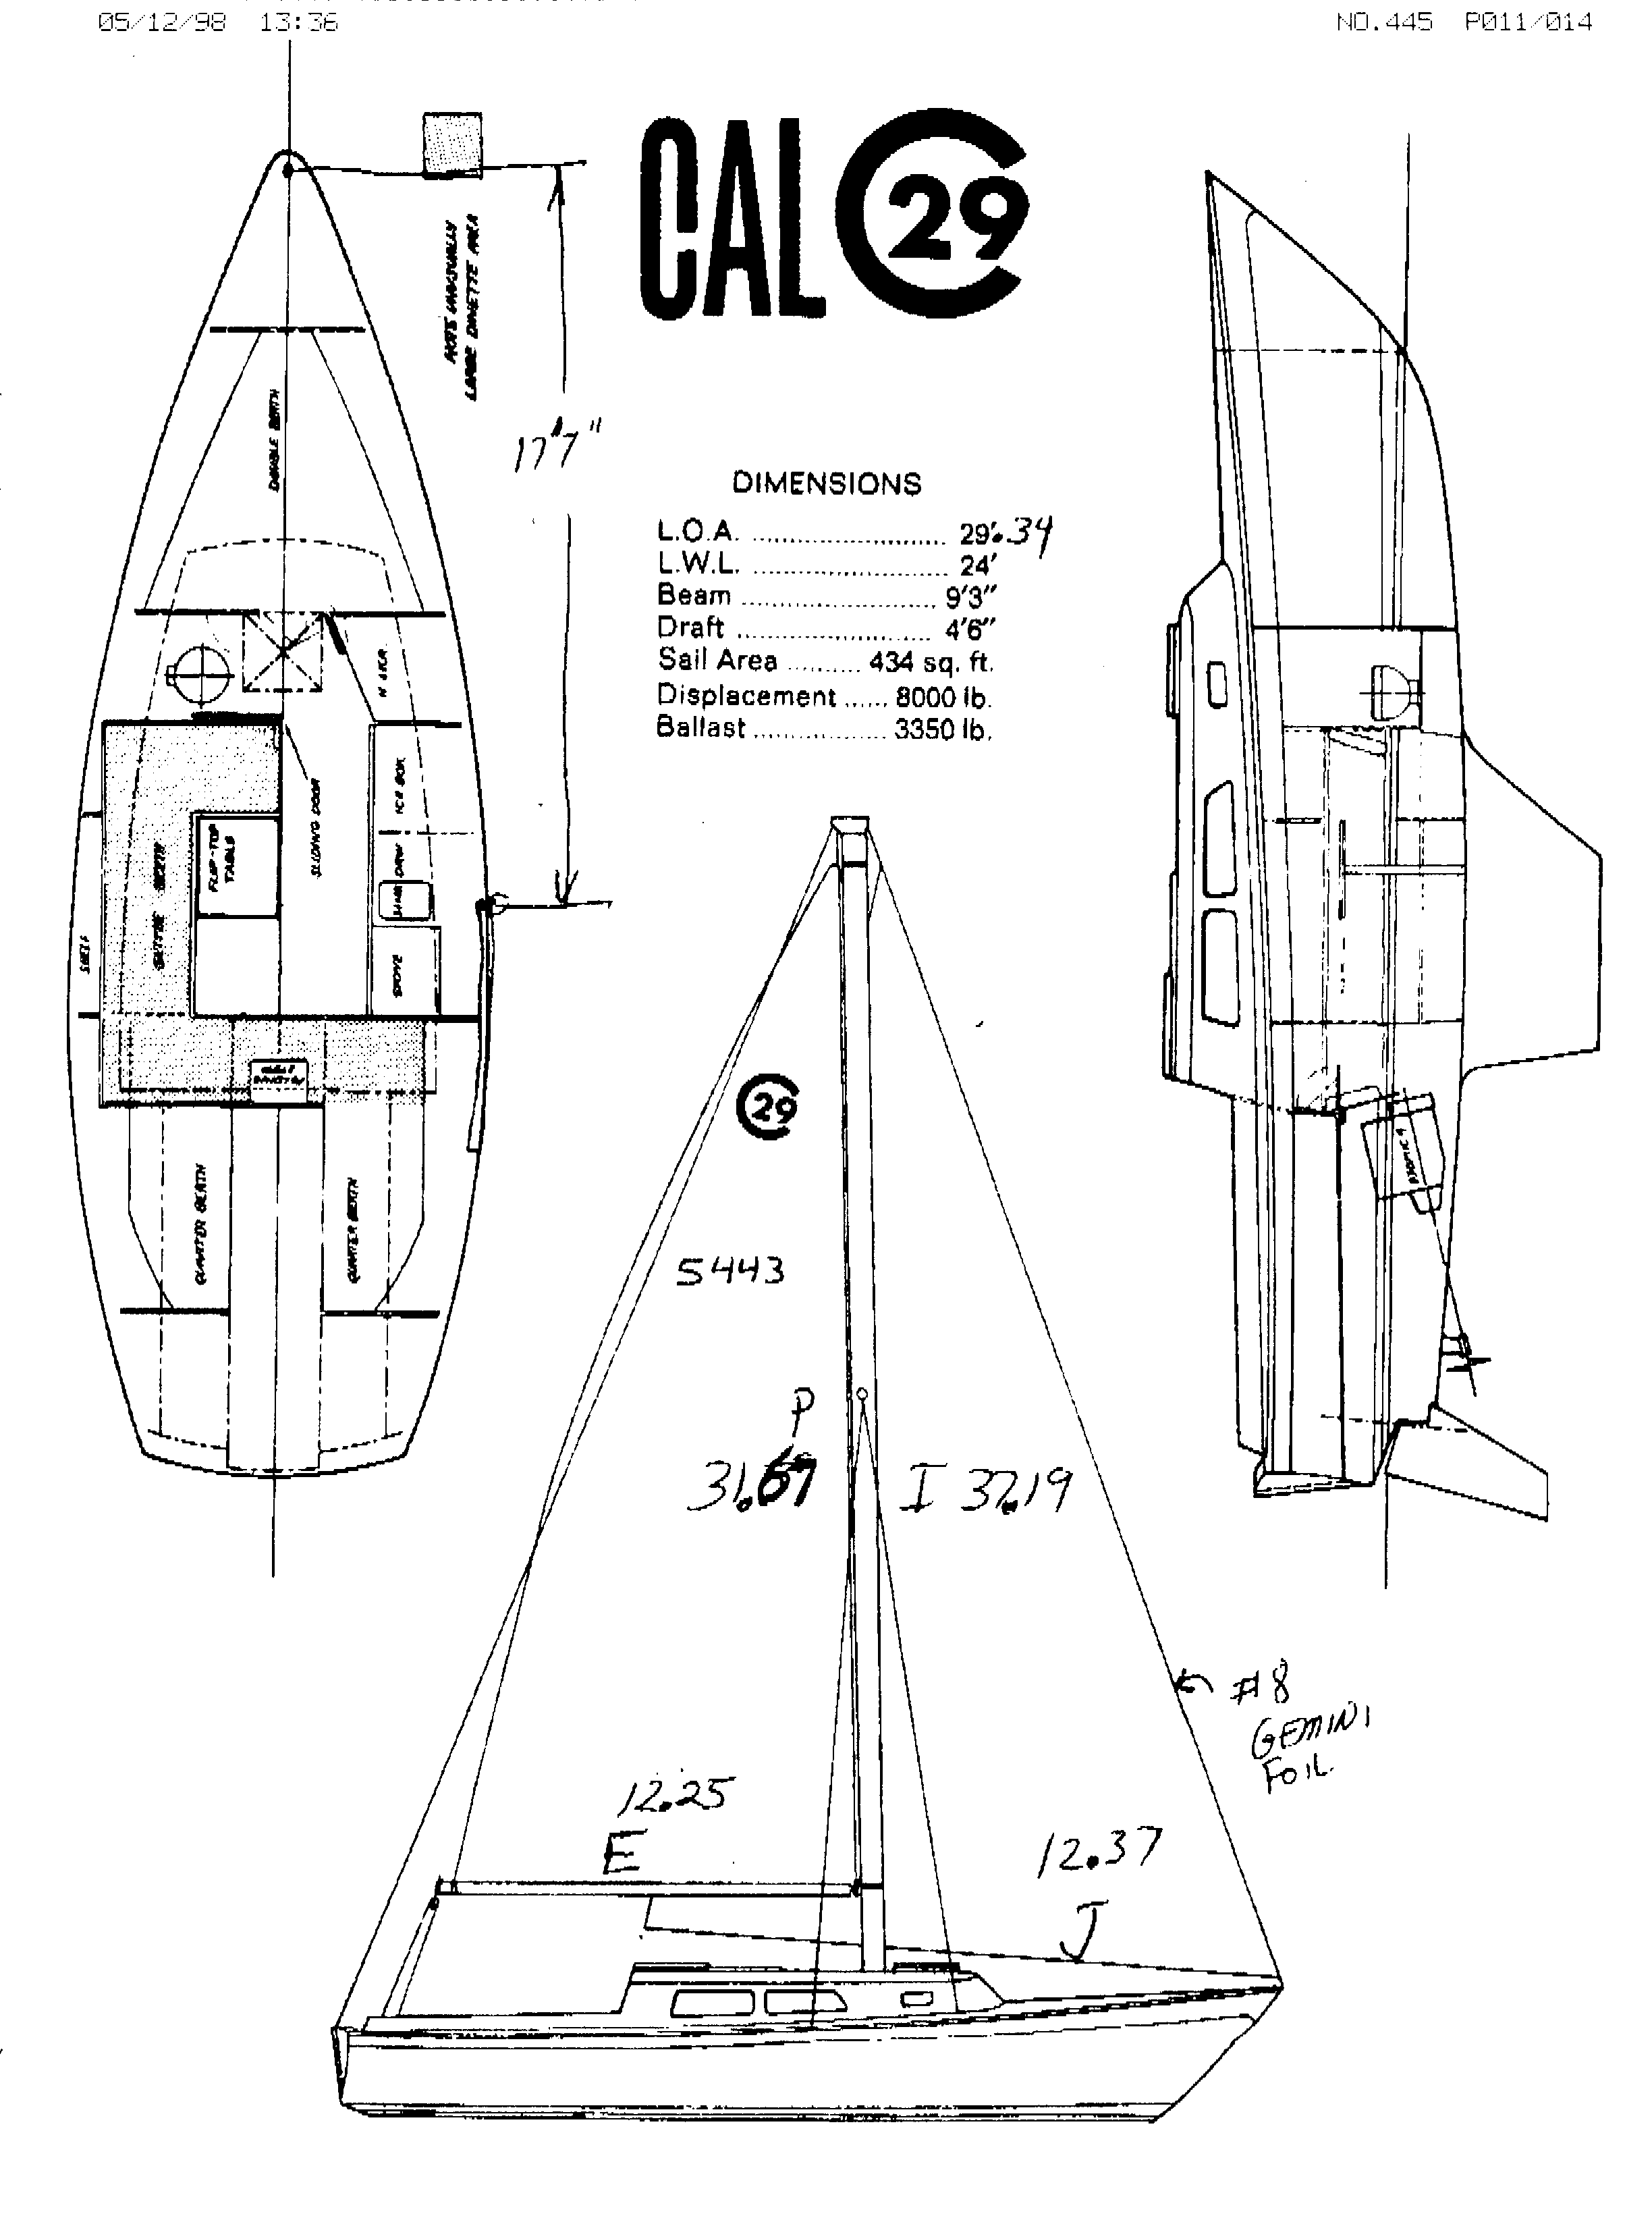
- Yacht name = unknown
- Sail number = 5443
- Hull number =
- Rig = sloop
- Model year = unknown
- Designer = Bill Lapworth
- LOA = 29.34'
- LWL = 24'
- Beam = 9' 3"
- Draft = 4' 6"
- Displacement = 8000 pounds
- Ballast = 3350 pounds
- I = 37.19 feet
- J = 12.37 feet
- P = 31.67 feet
- E = 12.25 feet
- Engine = inboard
- Keel = fin
- Rudder = spade
- Rig = masthead
- Berths= 6
- Steering= wheel
- PHRF = unknown
David Dobbs sent me copies of his Cal 29 Owner's Guide. The line drawing below was included with the guide. The line drawing is large (136k) for loading when the web is busy, but I'll provide you with plenty of reading while the image loads. Let me know if you have trouble loading this page. In the same e-mail, also let me know your modem's speed and the size of your computer system. It'll help me with future html code.
I will include the exact text from the Cal 29 Owner's Guide. I shouldn't infringe on any copyright laws since it was printed in the late '60s and the company that printed it (Jensen Marine) has been out of business for over 20 years. This guide should adapt to most any model Cal with the exception of the locations of the thru-hull valves and so forth.
OWNER'S GUIDE, CAL 29 The text below is quoted directly from Cal's User Guide from David Dobbs' Cal 29. This guide, with the exception of the location of some items such as thru-hull valves, should be OK to use for most any model of Cal Yacht.
Welcome into the fast-growing owner's group of Jensen fiberglass Yachts! Your CAL-29 has been carefully engineered and built to require a minimum of maintenance and a maximum of sailing pleasure. To insure this, the following is a description of the operational checks and tasks normally dealt with by the owner to maintain his CAL-29.
Let's become acquainted with these various operations by preparing your CAL-29 for a day's sail and discussing the maintenance routine you should follow. Slide the main hatch forward and remove the hatch board. Look below, for here we start our "Sailing Check-Off List."
1. STANDARD OUTBOARD MOTOR Before going below, we should look at the standard outboard motor installation. First remove the "Transom Door" and stow it below. Now take the outboard from its stowage in the port cockpit seat locker and mount on the transom. Once mounted, the outboard may be tipped up, out of the water, for sailing. Editor's note: It's interesting to note that an outboard engine was the standard engine for this 29 foot sailboat. Not many 29 footers come with an outboard this day and age. Dan
2. OPTIONAL INBOARD ENGINE Complete inspectional access to the engine may be gained by lifting the main companionway step, removing the bulkhead and also by a sliding
hatch in the port quarter berth. Operation procedures are well covered in the enclosed manual, Several important points should be re-emphasized,
- A. ENGINE COOLING WATER INTAKE Best access to this l/2" valve is in the Battery Compartment, under the main companionway step. This gate valve must be open while the engine is running. To OPEN, turn counter-clockwise; to CLOSE, turn clockwise. At least once a month, close and re-open this valve to keep it in working order. At this time, check the packing gland to avoid water seepage. While here, check the bilge for water. Our fiberglass hull is water-tight, but the ice Box drains into the bilge! Also there could be some seepage from the Head and Galley thru-hull fittings and the propeller shaft packing gland. The optional Hand Bilge Pump is installed here in the Battery Compartment. Check the batteries. factory installed batteries are an automotive type whose water level and charge must be maintained.
- B. FUEL TANK. A 20 gallon regular gas fuel tank ie located under the cockpit sole fill cap and vents aft on the starboard winch island. The Fuel Shut-Off Valve is on the tank's forward starboard side and is
reached via a "pop-out" access panel in the starboard quarter berth. When the handle is parallel to the fuel line, it is OPEN; at right angles, it is CLOSED, When not operating the engine, this valve should remain CL0SED. A partially filled gas tank can cause water condensation, a major cause of sticky valves, To avoid this, we recommend keeping the tank full and the carburetor bowl clean.
- C. PROPELLER SHAFT PACKING GLAND
Best, access to this item is via the port quarter berth sliding hatch. The Propeller Shaft Packing Gland should be damp --- tighten the nuts snug enough to eliminate any excessive water drips. While here, check the fallowing items:
- 1. Keep the Engine oil Ievel between the #1 and #'2 marks on the Bayonet Oil Gauge, Oil should be changed every f'orty to fifty operating hours with three to four quarts of' SAE #30 "H.D" detergent oil. Havoline is recommended by the manufacturer.
- 2. Distributor Oil Cup gets a couple drops of light oil and the Alternator Grease Cap a turn periodically.
- 3. The carburetor bowl may have to be filled using the hand primer on the fuel pump.
- D. INBOARD ENGINE STARTING PROCEDURE
- 1. Turn the Main Battery Switch, located in the starboard quarter berth, ta the position you have
designated as the engine battery. When the engine is running, NEVER pass through the "OFF" position to change from one battery to another for charging or the Alternator Diodes will be burned out. Switching from one battery to the other should only be done with the engine off. If both batteries are of equal charge, keep selector switch in "ALL" position. This position is also used to start, the engine when both batteries are low. When not operating the engine, use one battery for ship's gear, thus saving the second battery for starting the engine. Editor's note: I disagree with the above statement of running your battery selector on BOTH while charging batteries. Actually I got into trouble one time while doing this. This works only if your batteries are exactly the same brand, year, quality... I had a problem with one battery hogging all the charge when running on BOTH. It's really no big deal, but myself, I don't recommend it. Dan Dalrymple, editor, Old Cal Yachts homepage.
- 2. Run the bilge blower for five minutes prior to starting the engine. Switch is on the main instrument panel above the Main Battery Switch while the blower discharges out thru the clam shell on the starboard deck, aft.
- 3. Place Shift Lever into the large diameter ring of the Morse Control Head on the port cockpit seat riser, Start engine with lever in Vertical or NEUTRAL position. Lever FORWARD is FORWARD, AFT is REVERSE.
- 4. Place Throttle Lever into the Notched Control Head and advance about 45 to start engine. Note that the throttle may be adjusted without the lever by grasping the Notched Control Head and turing to the desired setting. Additional information on the Morse Control Unit may be obtained from the manufacturer.
- 5. Water and fuel. lines OPEN?
- 6. Pull out the Choke and Starter Switch. Press the Ignition
Button.
When engine starts;
- a. Gradually push in Choke.
- b. Move Throttle to idling speed.
- c. Check Oil Pressure: 30 to 35 pounds on s cold engine,
- d. Cooling System is operating only if water is coming out of Exhuast, (outlet on the transom, port side.
- e. If oil pressure is low, STOP the engine and cheek oil level.
- f. If water does not begin to flow out the transom outlet within 3 or 4 minutes, STOP the engine and check water intake valve.
- g, Turn off Blower.
- 7. Run engine at idle when shifting into forward ar reverse. If equipped with a Martec Prop, (Right Hand, 12" x 6 x 1") please follow the instructions in the Appendix. At half throttle the CAL 29 will power around 6 knots using about one gallon of fuel per hour. ln smooth water, higher speeds can be obtained with higher RPM's but fuel consumption will increase accordingly.
- 8. To Shut Down engine:
- e. Push IN the Starter Switch.
- b. Close Fuel Shut-Off Valve and Cooling Water Intake Gate Valve.
- c. Mark and align Propeller Shaft for Sailing Position and shift into FORWARD to lock, With a standard two blade solid or feathering prop, the blades should be vertical. With a folding prop, the blames should be horizontal.
III. GALLEY. Water is supplied to the sink f'rom a 25 gallon fresh water tank under the forward double berth, The tank fill, a bronze plug with a 1/2" square recess, is on the aft end and the vent is in the forepeak.
If the Galley Sink Drain Thru-hull is equipped with the optional Gate Valve, this 3/4" valve is located directly under the sink. The sink's thru-hull valve should be kept closed while sailing as excessive heel on the port tack will fill the sink and splash water into the interior.
Remember that the 50 pound Ice Box drains into the Bilge. Editor's note: My neck's still sore from crawling thru hatches trying to figure where my Cal 2-27 was leaking. After two days of searching for a leak, my wife Karen asked "I wonder where that icebox drains?"
GALLEY STOVE. A 2 or 3 burner Pressure Alcohol Stove is the normal optional installation, Operating instructions come with the stove but a few additional points on stove operation are important.
The optional 2 gallon pressure tank is located under the galley sink. When filling this tank, please observe the following BEFORE removing the stopper
- 1. All burners are OFF.
- 2. Main Alcohol Shut-Off 'Alve an top of pressure tank is CLOSED,
- 3. Tank pressure is ZERO: Remove Stopper.
- 4. Fill the tank three-quarters fbi to allow for air pressure.
- 5. Replace stopper and screw down tight.
- 6. Experience has shown that 5 pounds of tank pressure is more than adequate and imposes less strain on the fittings than the recommended 10 pounds.
Please note than when you convert the Dinette Table into a Double Bunk, that the long pipe support is replaced by the shorter 12" pipe to give proper support to the Double Bunk.
To flush the Marine Toilet, swing the valve OUTBOARD to OPEN and pump. To dry bowl, swing the valve INBOARD to CLOSE and pump. An instruction sheet is enclosed but additional information and replacement parts can be abtained from the manufacturer,
lf you have supplied the thru-hulls with optional Sea Cocks, they may be kept open while sailing with no ill effects
assuming the head's internal "joker" valve is not held open by refuse. The 1/2" gate valve for the water Intake is located aft under the
forward Dinette Seat, while the 1-1/4" gate valve for Discharge is located just aft of the bowl.
Click here to
download an early (70's) Cal 29 manual in .pdf format.
Thanks again to David Dobbs and his Cal 29 for this webpage. We are always glad to hear and view Cal owners that enjoy their old Cals. Send me some photos and copies of your Cal's specs and I'll put you on the web. Dan Dalrymple, editor, Old Cal Yacht homepage.
Just click here to return to Cal Yacht homepage. or simply use your browser's BACK button . . .
|